
The GB-540 is a HA1.2 ZigBee acoustic glass-break detector with a superior detection quality. The product can be mount on walls or ceilings to detect breaking of framed glass on any exterior wall. The detector senses the sound of most types of breaking glass, including plate, tempered, laminated, wired, coated and sealed insulated glass.
Specifications Installation Pairing Resetting to Factory Default Settings
Features and Specifications
- Superior detection algorithm sensing the sound of most types of breaking glass, including plate, tempered, laminated, wired, coated and sealed insulated glass.
- Easy installation with high-strength mounting tape (included)
- No need for additional tooling for installation verification
- User friendly battery replacement process
- Tamper alert is reported when a tamper event occurs.
- Battery Life estimation is more than 4 years (for typical use).
- Compliant with Zigbee 1.2 HA
- OTA firmware upgrade support
Technical Specs
- Battery: 3 V Lithium CR-123 1.45Ah type battery, Panasonic or GP only
- Nominal Battery Capacity: 1.45 Ah
- Dimensions 88X62X30mm (3.5 ”X2.4”X1.2”)
- Operating Temperature -10°C to 50°C (14°F to 120°F) indoors
Installation
Optimizing detection and avoiding false alarms
For best detection avoid installing the detector in the following locations:
- Rooms with lined, insulated, or sound deadening drapes
- Rooms with closed wooden window shutters
- The same wall as the protected glass
NOTE: Mount the detector at least 1.8 m (6 ft)from the floor and at least 0.3 m (1 ft)from the ceiling.
For best false alarm immunity avoid the following locations:
- Locations where white noise such as an air compressor is present
- Rooms smaller than 3 x 3 m (10 x 10 ft) and rooms with multiple noise sources such as small kitchens, utility rooms, bathrooms, glass booths/ vestibules, stairwells, and garages
NOTE: The Wireless GB-540 is not hermetically sealed.Do not install in rooms where humidity is high as excess moisture on the circuit board can eventually cause a short and generate a false alarm.
24-Hour Loop Applications The GB-540 is recommended for perimeter loops and is designed to function in an occupied area.In a 24-hour loop application,the sensor is armed all day and night.In this scenario,the prevention technology is stretched to its limit as some sounds can duplicate the glass break pattern that the acoustic sensor detects. Installthe GB-540 on a perimeter loop which is armed whenever the door and window contacts are armed. NOTE: GB-540 must be installed in accordance with the Standard for Installation and Classification ofBurglar and Holdup Alarm Systems,UL 681. Protecting occupied areas The false alarm immunity is best in rooms with only moderate noise. To protect a 24-hour occupied area, use shock sensors.
Installation Procedures
- Fasten the mounting plate to the wall using the provided screws and anchors, through the mount openings (A).
- To enable the wall tamper secure the breakaway segment (B) also to the wall.
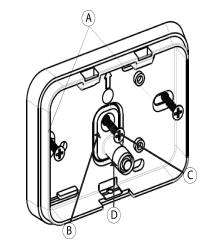
A. Mount Options
B. Break-Away Segment
C. Fastening Screw
D. Tamper Contact
Note: The back tamper switch for the GB-540 is under the Printed Circuit Board (PCB). When the PCB is seated firmly within the base, the switch is pressed against the special break away base segment that is loosely connected to the base. Be sure to fasten, using screw C, the breakaway segment to the wall. If the detector unit is forcibly removed from the wall, this segment will break away from the base, causing the tamper switch to open.
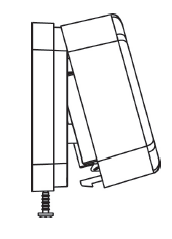
- Replace the cover on the base and secure with screw
Joining to a Touchscreen
Glassbreak sensors and other security sensors require a professional installer. Please contact a representative to schedule your installation today.
Joining to a Hub
- From the app, navigate to More > Manage Devices > Add Device > Glassbreak Sensor
- Pull the tab from the bottom of the device to activate the sensor
- Open and close the device to begin the network search
- Select “Continue” to begin the pairing process
- As the devices are discovered, they will appear on the screen
- Click “Done”
NOTE: The red LED blinks for a brief time, followed by three green LED blinks to signal the device is searching for a network
NOTE: The red LED blinks for 20 seconds and stops. The green LED blinks for 100 seconds or until the network search is completed.
If the app does not locate your device, follow the steps below to reset your module to factory default settings and retry
Resetting to Factory Default Settings
- Unfasten the base screw (A) and press in the snap button (B) to separate the cover from the base (If the device has not been paired, there will be an activation strip on the bottom of the device (C)).
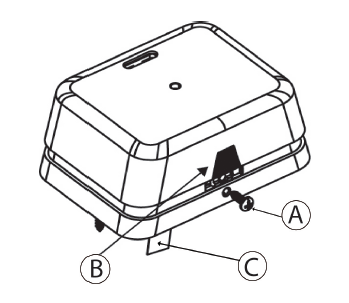
- Identify the battery (A), factory default button (B), and the tamper contact (C).
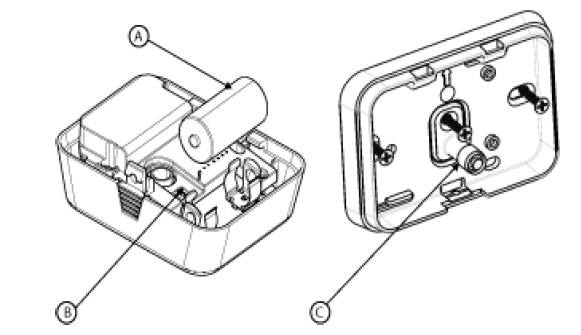
- With the battery inserted and the device powered on, press and hod the factory default button (B) for 5 seconds. The green LED turns on for 2 seconds, the device is removed from any previous networks, and is ready to be installed as new.