
Visonic’s MCT-350 is a fully supervised Zigbee Door/Window sensor, with excellent design, performance and battery life. The product provides an easy installation and battery replacement process. It also supports Zigbee HA1.2 and ongoing upgrades through OTA
Specifications Installation Pairing Resetting
Features and Specifications
- Compact form factor to blend into the decor of most installations
- Easy installation with high-strength mounting tape (included)
- User friendly battery replacement process
- Wide Gap performance able to be installed in tough situations where magnet gap is over 1.25″
- Tamper alert is reported when a tamper event occurs.
- Battery Life estimated at 3-5 years (for typical use).
- Compliant with Zigbee 1.2 HA
- OTA firmware upgrade support
Technical Specs
- Battery: 3V Lithium battery, type CR2450; Use Panasonic only
- Nominal Battery Capacity: 620 mAh
- Dimensions : L59.5 x W29 x H11 mm (2-11/32 x 1-9/64 x 7/16 in.)
- Operating Temperature: 0°C to 50°C (32°F to 122°F)
Installation
Please make sure that the sensor and magnet is located less than 0.25 inch from each other. For optimal performance, it is highly recommended to install the Door/Window sensor on the fixed frame and the magnet on the moving part of the door/window. Place the sensor near the top of the door that close to the opening edge of the door. This is the mounting location for the sensor.
Use the provided double-sided tape on the sensor. Attach the sensor to the door/window frame. Press firmly and hold in place for a few seconds. Secure it with silicone if needed.
Use provided double-sided tape on the magnet. Make sure the alignment of both sensor and magnet are facing each other. Press firmly and hold in place for a few seconds. Secure it with silicone if needed.
Spacers are used to raise the level of the magnet to be level/closer to sensor.
Joining to a Touchscreen
Door/Window sensors and other security sensors require a professional installer. Please contact a representative to schedule your installation today.
Joining to a Hub
- From the app, navigate to More > Manage Devices > Add Device > Door/Window Sensors
- Select “Continue” to begin the pairing process
- As the devices are discovered, they will appear on the screen
- Click “Done”
If the app does not locate your device, follow the steps below to reset your module to factory default settings and retry
Resetting
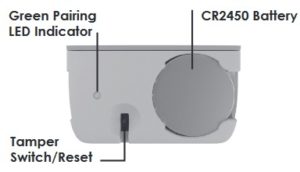
Remove the battery from the sensor.
While holding down the tamper switch, reinsert the battery.
Release the tamper switch when the LED turns green.