Mounting Guidelines
Mount the CO sensors in or near bedrooms and living areas. We recommend you install a detector on each level of your home. When choosing installation locations, be sure you can hear the sensor from all sleeping areas. If you install only one sensor in your home, install it near bed-rooms, not in the basement or furnace room. Place the sensor out of reach of children. Under no circumstances should children be allowed to handle the sensor. Selecting an improper location can affect the sensitive electronic components in your sensor. To avoid damaging the unit, to provide optimum performance, and to prevent unnecessary false detection, do not install the sensor:
- In kitchens, garages, or furnace rooms that can expose the sensor to substances that can damage or contaminate it.
- Near vents, flues, chimneys, or any forced/unforced air ventilation openings.
- Within 5 feet of heating or cooking appliances. We recommend 15 feet to prevent nuisance alarms.
- In areas where the temperature is colder than 40°F (4.4°C) or hotter than 100°F (37.8°C) such as crawl spaces, attics, porches, and garages
- On metal surfaces
- In areas with a large quantity of metal or electrical wires
- Near ceiling fans, doors, windows, or areas directly exposed to the weather
- In dead-air spaces, such as peaks of vaulted ceilings or gabled roofs, where CO might not reach the snesor in time to provide early warning.
- Near deep-cell large batteries. Large battereis have emissions that can cause the alarm to perform at less than optimum performance.
- In areas that obstruct the vents located on the alarm
- Where drapes, furniture, or other objects block the flow of air to the vents.
Mounting the Sensor
The sensor can be wall mounted or ceiling mounted.
1. Slide the sensor body off the mounting plate. Place the mounting plate in the desired location and mark the location of the 2 mounting holes. Orient the mounting plate vertically or horizontally.
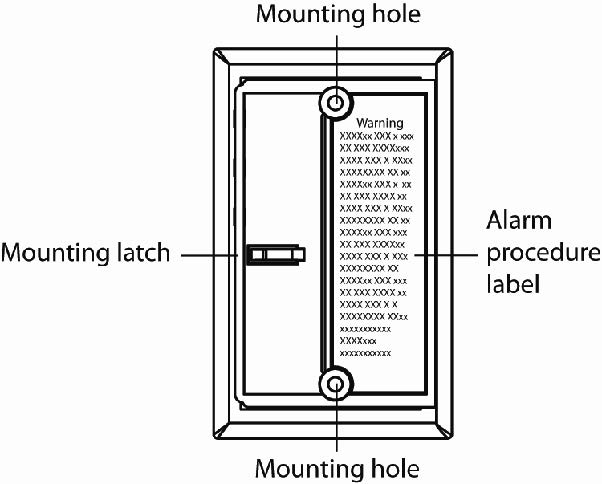
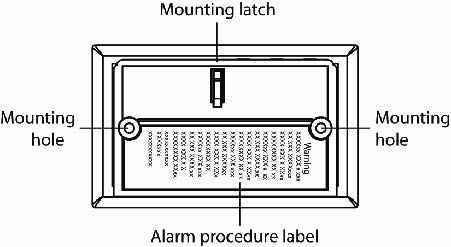
2. Insert the supplied two screws and secure the mounting plate to the wall or ceiling surface. If mounting in plasterboard or drywall, drill a 3/16 in. hole and use the plastic anchors provided.
3. After the mounting plate is secured, slide the sensor over the mounting plate
4. Pull out the battery pull tab to power-up the sensor
5. Two labels are provided that have important information on what to do in case of an alarm. Record the phone number of your emergency service provider in the space provided. Then place one label next to the alarm after it is mounted, and the other label near a fresh-air source, such as a door or window.
Installing/Replacing Batteries
The sensor comes with 3 batteries pre-installed. When you need to replace them, use the following procedure. Be sure the sensor is mounted to the wall and sits on the mounting plate before performing this procedure.
1. Slide the sensor body off of the mounting plate.
2. Remove the old batteries and dispose of them properly, as recommended by the battery manufacturer.
3. Install the new batteries. Note the polarity shown in the battery compartment.
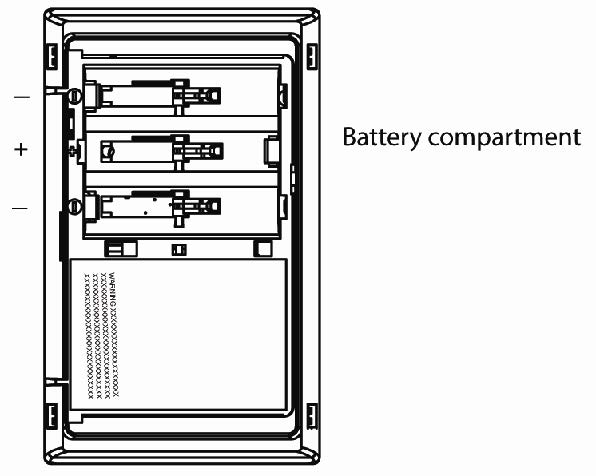
4. Slide the sensor body back onto the mounting plate. Note: The mounting plate will not close if all 3 batteries are not installed.
5. When replacing batteries, use one of the following approved brands, which can be purchased at your local hardware store. Note: Using a different battery can affect the alarm operation detrimentally.
- Duracell MN1500 or MX1500
- Energizer E91
6. After installing or changing the batteries, reinstall your sensor. Use the Test/Hush button to test your sensor. Confirm that the green Power LED is ON.
Testing the sensor
Before running any tests, observe the following guidelines:
Due to the loudness of the sensor, you may want to place your fingers over the sounder vent while testing your sensor. Continuous exposure to the high sound level of this sensor over an extended period of time may cause hearing loss.
1. Wait at least 10 minutes after installing the sensor to test the CO alarm, and be sure the green Power LED is flashing for normal operation.
2. Press and hold the Test/Hush button until the sensor beeps once (approximately 1 second), then release the button. If the sensor is operating properly, you will hear 4 quick beeps, followed by 5 seconds of silence and 4 quick beeps.
Note: This test mode does not test communication with the Hub.