General Guidance for Installation
1. Do not install near sources of heater/cooling.
2. Do not aim at windows.
3. Do not install outdoors.
4. Do not install where direct sunlight can strike the unit.
5. Do not install near high-voltage electrical lines.
6. Do not install behind any obstruction.
7. Do not mount on unstable surfaces.
Installation Procedures
For battery installation, see steps 1-3 below. For mounting the detector, see step 4 below.
Note: The detector transmits a low battery signal upon detection of low voltage. It is recommended to wait about 1 minute after battery removal, before inserting the new battery.
Battery Installation:
1. Remove the screw from the bottom of the detector and remove the outer cover.
2. Push the catch(small tab at the top of the circuit board) and remove the circuit board.
3. Insert the battery.
Mounting Instructions:
4a. If using double sided tape, place tape on the device in a way that the tape will make solid contact with the device and the wall when positioned in it’s final location.
4b. If using screws, use the screw holes on the angled sides if installing in a corner, or on the flat back if installing flat against a wall.
Jumper Settings
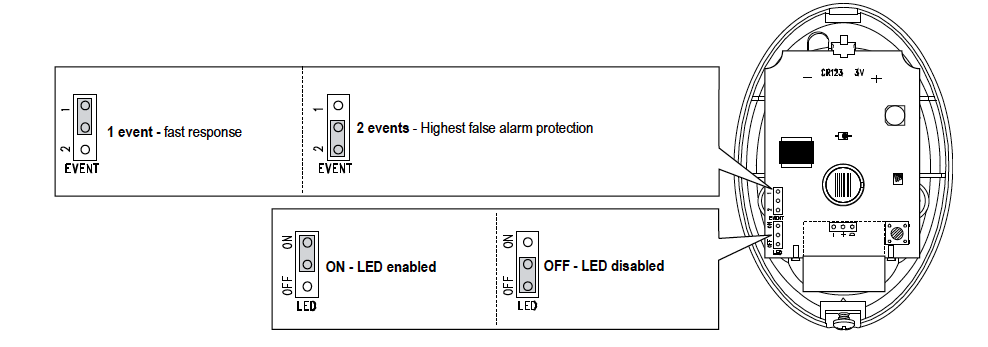
The K9-85 has two jumpers located on the circuit board. The top jumper can be used to tell the detector how many events to detect before reporting a motion event to the hub. The second jumper tells the detector whether to flash the LED on the front of the device when it detects motion.
Walk Test
Walk in front of the motion detector in both directions. The LED should light for 2-3 seconds each time your motion is detected. (Keep in mind that the detector will sleep for 2 min after detecting motion in an effort to save battery life.)
Important! Walk test at least once a week to verify proper function of the detector.


