
IF ADDING THE KWIKSET SMARTCODE DOOR LOCK TO A NON MONITORED AUTOMATION SYSTEM, CLICK HERE FOR INSTRUCTIONS.
Kwikset 914 Deadbolt SpecsKwikset 910 Deadbolt SpecsKwikset 912 Lever Lock SpecsKwikset 914/910 InstallationKwikset 912 InstallationJoining to a TouchscreenProgramming User CodesKwikset 910/912/914 – Resetting to Factory Defaults
The SmartCode™ 914 deadbolt with Home Connect™ Technology is the most robust SmartCode lock ever made. The metal housing delivers quality that can be felt for added security and durability. A Kwikset SmartCode keyless entry lock will allow the lock to communicate wirelessly to security and home automation systems via ZigBee to enhance your lifestyle.
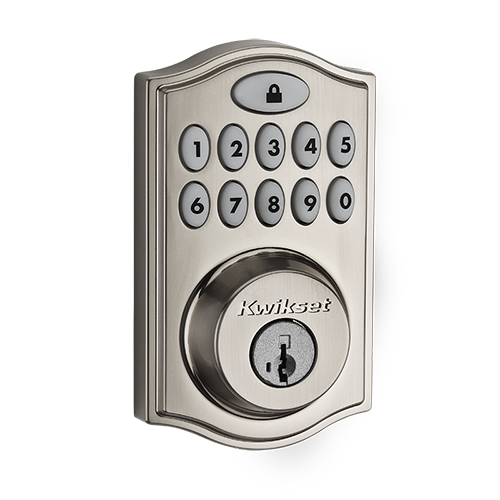
Kwikset SmartCode 914 Specifications
- Secured keyless entry convenience
- One touch locking
- Dramatically reduced interior size and sleek metal design
- 30 user codes plus mastercode feature for added security
- 10 digit backlit keypad with dedicated lock button
- BHMA grade 2 certified
- SmartKey® technology – the lock you can re-key yourself in seconds in three easy steps
- Patented side locking bar technology offers improved security by protecting against lock bumping, an attack technique used to defeat conventional pin & tumbler locks
- Installs in minutes with just a screw driver no hard wiring needed
- Fits standard doors (1-3/8in. – 2in.) no new screw holes required
- Lifetime mechanical and finish warranty. 1 year electronics warranty
TECHNICAL SPECS
- Battery Type: 4 x AA, 6V
- Battery Life: 12 Months
- Operating Temp:
- Exterior: -40 deg F to 150 deg F
- Interior: 32 deg F to 140 deg F
- Dimensions:
- Lock Exterior:Width: 2 5/8″ Height: 4 7/16″ Projection: 1 3/16″
- Lock Interior:Width: 2 3/4″ Height: 4 3/4″ Projection: 2″
- Door Prep: 2 1/8″ diameter face hole & 1″ diameter latch hole
- Backset: Adjustable 2 3/8″ or 2 3/4″
- Door Thickness: 1 3/8″ – 2″ automatic adjustment
- Faceplates: 1″ x 2 1/4″ round corner standard
- Strikes: Round corner strike 2 3/4″ x 2 1/8″
- Bolt: 1″ throw, steel deadbolt
The SmartCode 910 Electronic Deadbolt with Home Connect Technology featuring Zigbee enables the door lock to wirelessly communicate with other devices in home. The lock allows the user through a web enabled device to remotely check the door lock status, lock or unlock the door and receive text or email messages.
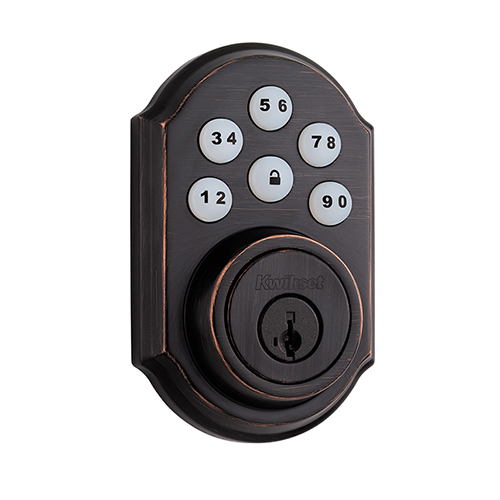
Kwikset SmartCode 910 Specifications
- Secured keyless entry convenience
- One touch locking
- 30 user codes plus mastercode feature for added security
- 5 digit backlit keypad with dedicated lock button
- SmartKey® technology – the lock you can re-key yourself in seconds in three easy steps
- Patented side locking bar technology offers improved security by protecting against lock bumping, an attack technique used to defeat conventional pin & tumbler locks
- Installs in minutes with just a screw driver no hard wiring needed
- Fits standard doors (1-3/8in. – 2in.) no new screw holes required
- Lifetime mechanical and finish warranty. 1 year electronics warranty.
TECHNICAL SPECS
- Battery Type: 4 x AA, 6V
- Battery Life: 12 Months
- Operating Temperature: Exterior: -40°F to 150°F Interior: 32°F to 140°F
- Dimension:
- Lock Exterior:Width: 2 27/32″ Height: 4 1/2″ Projection: 1 3/16″
- Lock Interior:Width: 3 1/4″ Height: 7 13/32″ Projection: 1 3/4″
- Door Prep: 2 1/8″ diameter face hole & 1″ diameter latch hole
- Backset: Adjustable 2 3/8″ or 2 3/4″
- Door Thickness: 1 3/8″ – 2″ automatic adjustment
- Faceplates: 1″ x 2 1/4″ round corner standard
- Strikes: Round corner strike 2 3/4″ x 2 1/8″
- Bolt: 1″ throw, steel deadbolt
The SmartCode 912 Electronic Deadbolt with Home Connect Technology featuring Zigbee enables the door lock to wirelessly communicate with other devices in home. The lock allows the user through a web enabled device to remotely check the door lock status, lock or unlock the door and receive text or email messages.
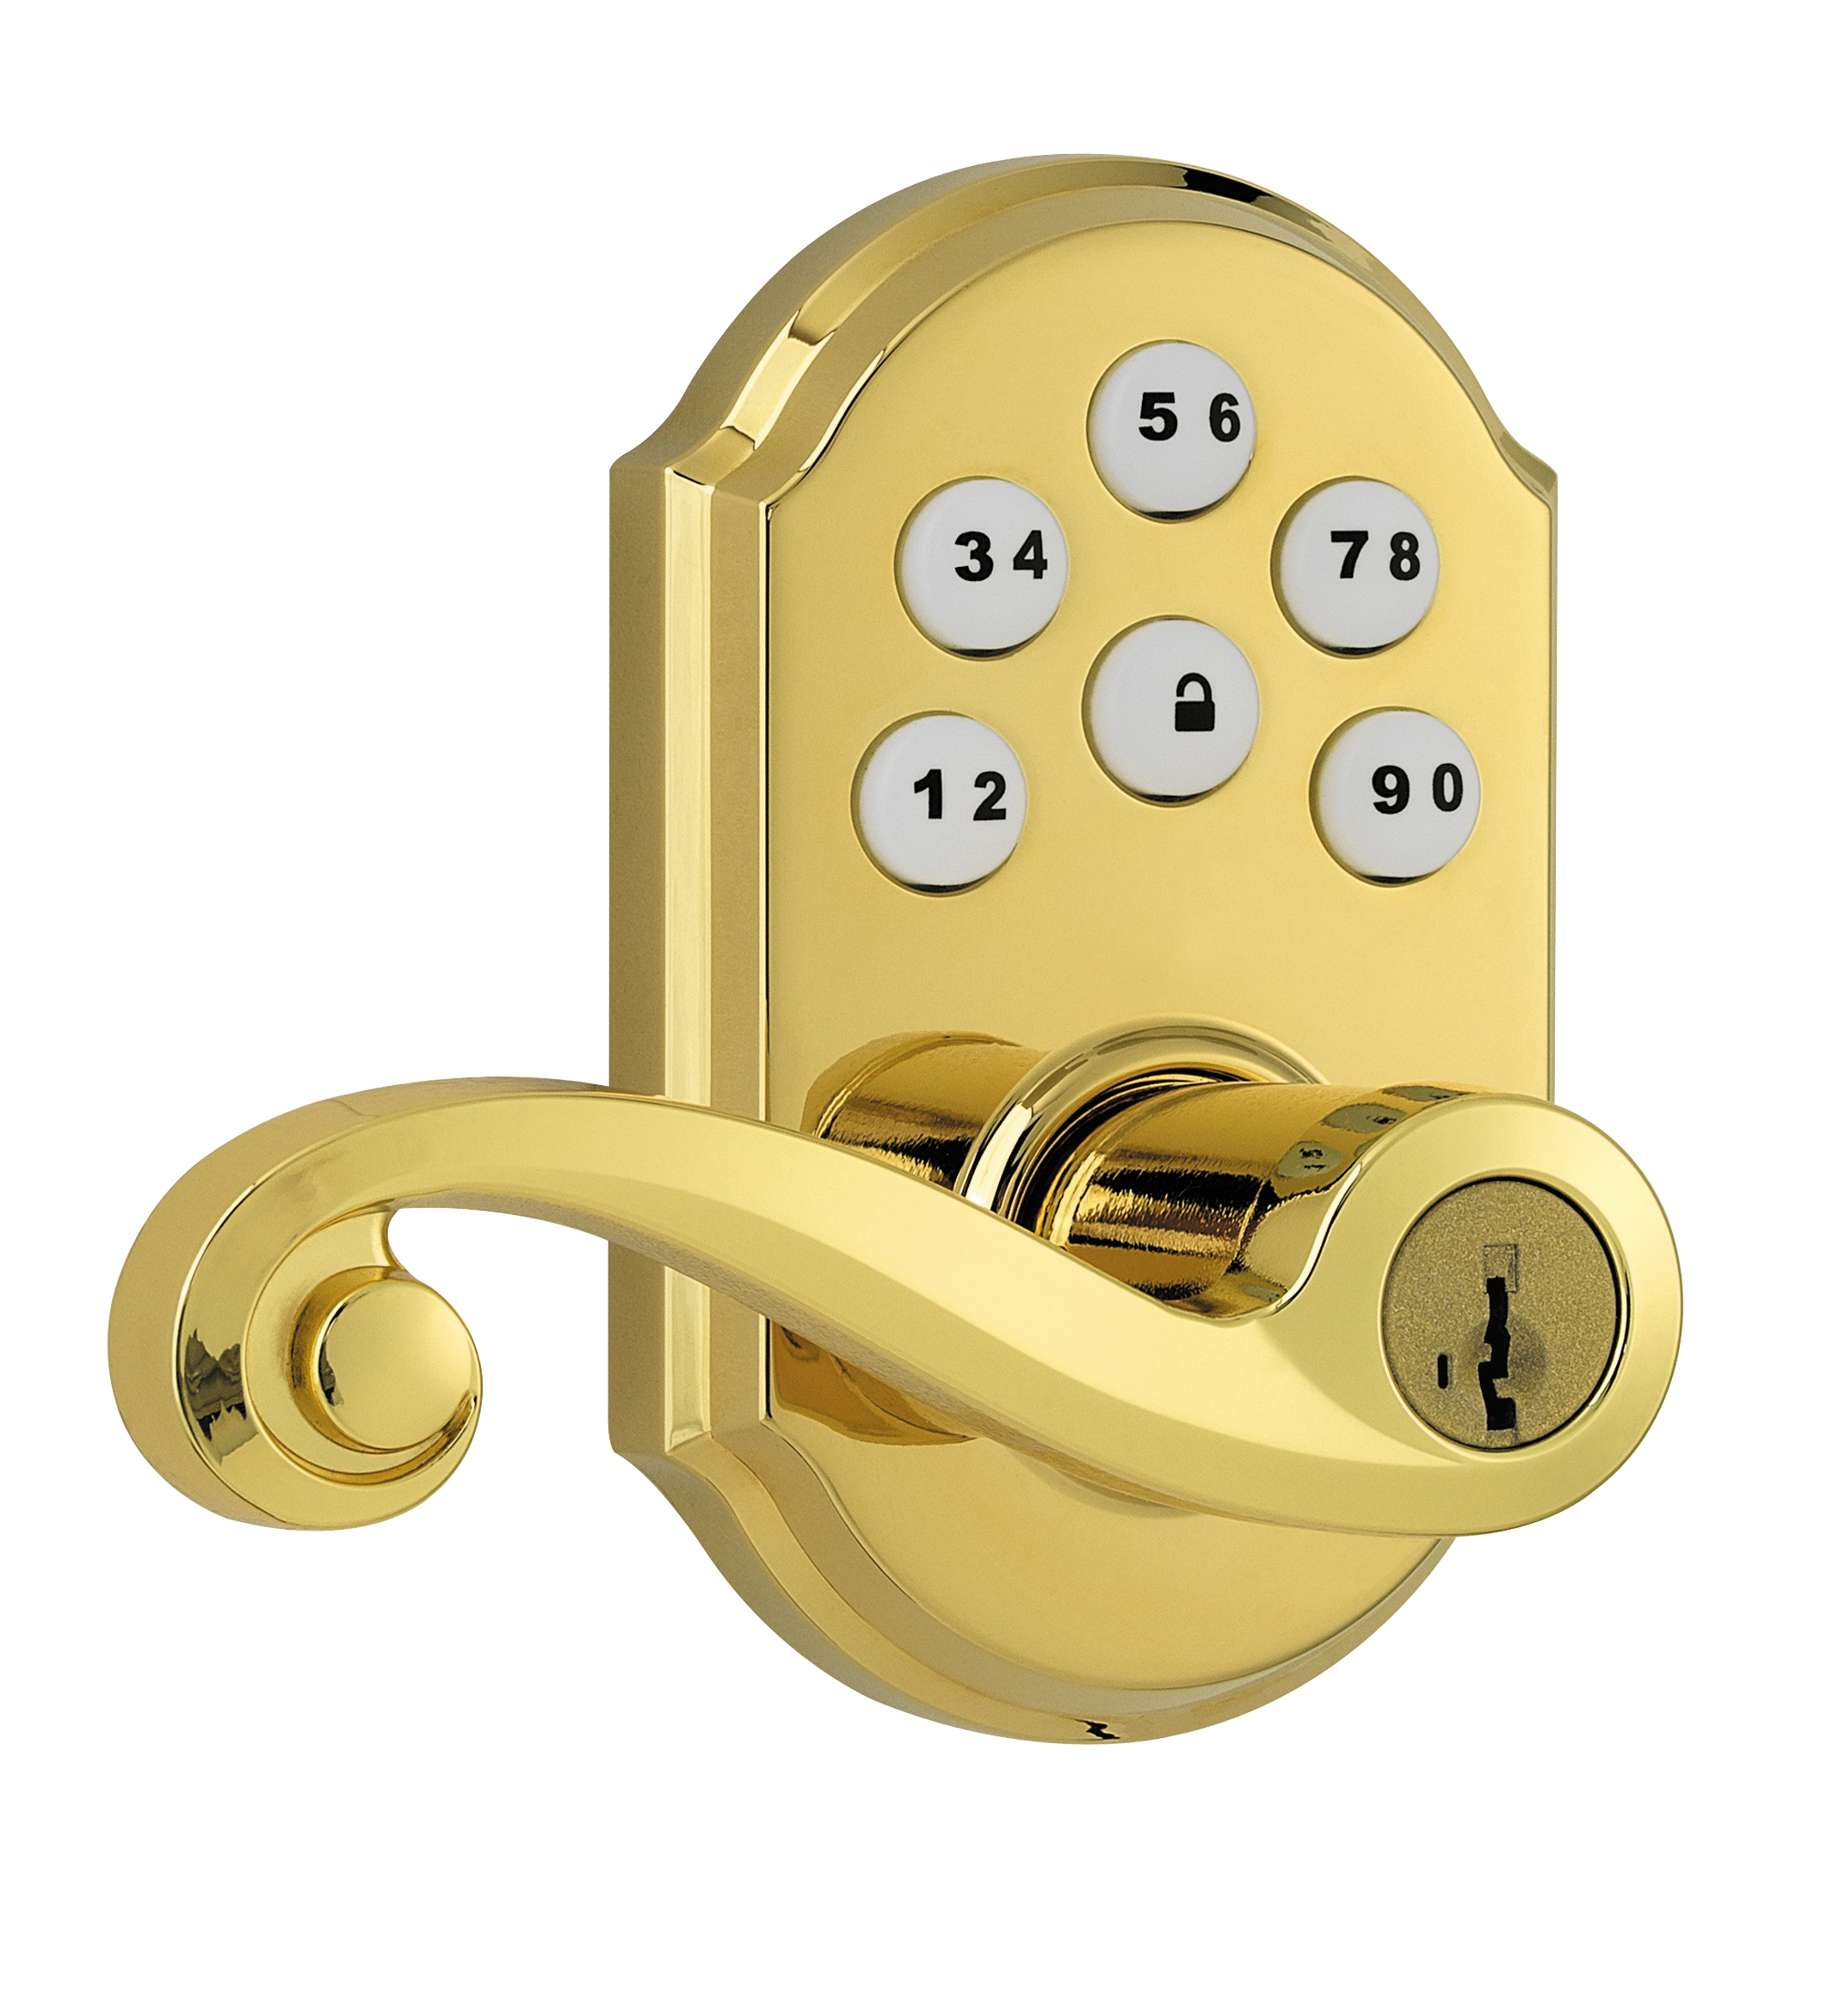
Kwikset SmartCode 912 Specifications
- ZigBee HA1.2 Enabled for remote access
- Kwikset Signature series product – 1-touch locking convenience
- Features SmartKey® re-key technology as the back keyway; re-key the lock yourself in seconds with 3 easy steps
- 30 Customizable access codes for increased security; back-lit keypad for increased visibility
- Customized, automatic door locking after 30 seconds for peace of mind
- Installs in minutes with just a screwdriver – no hard wiring needed
- Fits standard doors (1-3/8″” to 1-3/4″”) – no screw holes required
- Lifetime mechanical and finish warranty; 1-year electronics warranty
TECHNICAL SPECS
- Disposable AA Alkaline last 1 year
- Dimensions – Exterior: 2-13/16″”x4-7/16″”x2-11/16″” (WxLxD) Interior: 3-3/4″”x6-3/4″”x3-13/32″” (WxLxD)
- Operating Temperature: -20 – 70°C
Physical Installation (910 and 914 Deadbolt Models)
If drilling a new door, use the supplied template and the complete door drilling instructions available at www.kwikset.com/doorprep.
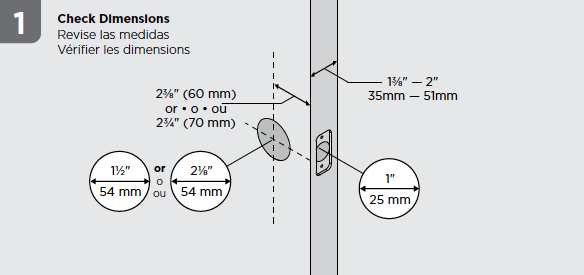
Measure to confirm the following:
- Hole in the door is 1 1/2″ (38mm) to 2 1/8″ (54mm)
- Note: Additional door preparation may be required for doors with 1 1/2″ (38mm) holes. Consult the deadbolt drilling instructions at www.kwikset.com/doorprep
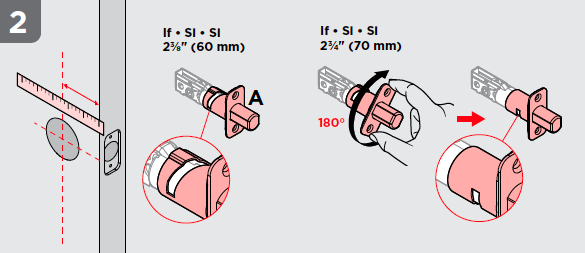
- Backset is 2/38″ (60mm) to 2 3/4″ (70mm)
- Hole in door edge is 1″ (25mm)
- Door is between 1 3/8″ (35mm) and 2″ (51mm) thick
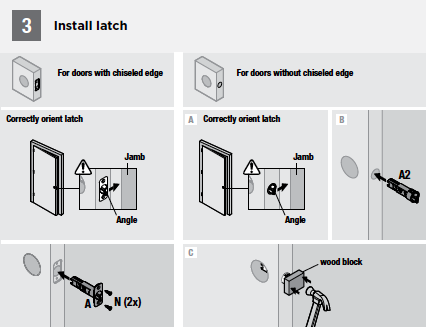
Measure and adjust the latch
- If the latch bolt is not already extended, use a screwdriver to extend the latch bolt so that it is in the out position
- Hold the latch in front of the door hole, with the latch face flush against the door edge to determine needed length of latch
- Adjust length of latch by rotating latch face
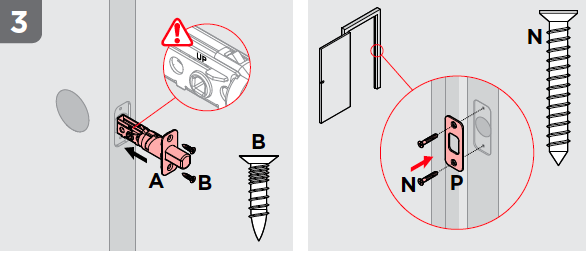
Install the latch and strike
- Insert latch into latch hole until latch face is flush against door. Tighten with provided screws.
- Install strike on door frame
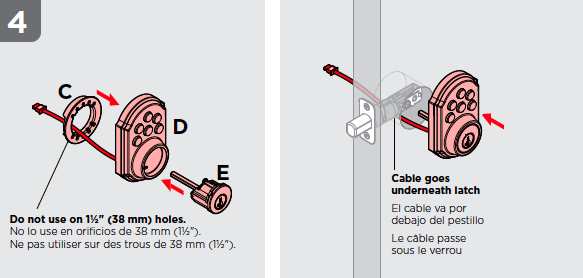
Install the Exterior Keypad
- Determine if the Adapter Ring “C” is needed. The Adapter Ring is only needed on door holes measuring 2 1/8″ (54mm).
- Discard Adapter Ring if door hole is 1 1/2″ (38mm)
- Install Exterior keypad and feed cable underneath latch
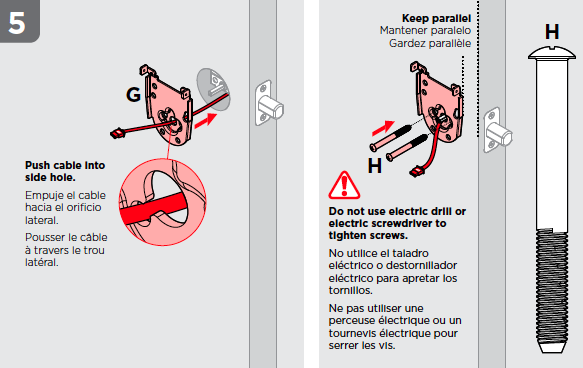
Install mounting plate
- Use the provided bolts to tighten the mounting plate to the exterior lock.
- Keep edge of mounting plate parallel with edge of door
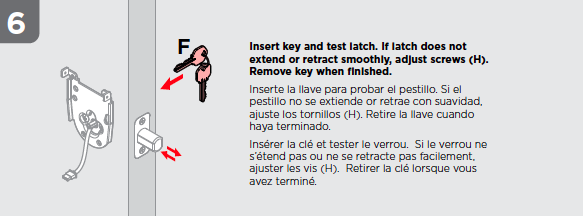
Test lock
- Insert a key into the exterior lock and test the latch. If the latch does not extend or retract smoothly, adjust the screws as needed (remove key when finished)
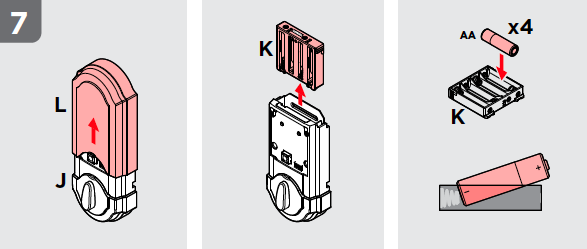
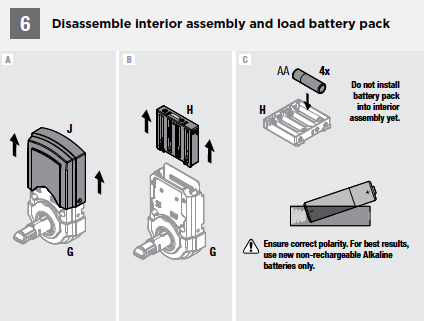
Install interior assembly
- Remove the battery cover and battery pack from the interior assembly
- Place batteries into battery pack, but do not place the battery pack into the lock at this time
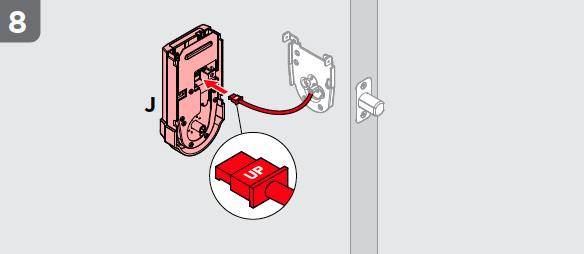
Connect wire
- Pull the wire from the exterior lock tight and connect to the interior assembly.
- Note the direction of the connection on the interior assemble
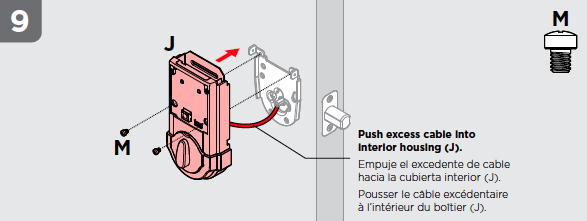
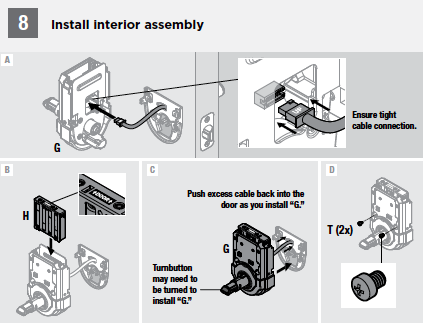
Install interior assembly
- Lay excess cable flat inside the bottom of the interior assembly housing
- Fit interior assembly onto lock cylinder and tighten with provided screws
Install batteris and “Hand” lock
- Confirm AA batteries are installed in battery pack being careful to note polarity of batteries
- Press and Hold the “lock” button on the front of the keypad and install battery pack will holding the lock button
- Hold lock button until latch begins to move
- If the latch bolt extends and retracts on its own, the handing process is completed. If it does not, remove batteries and wait 15 seconds and repeat
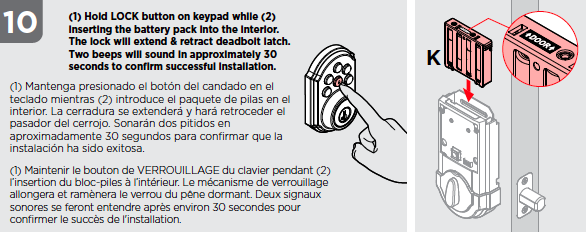
Replace battery cover
- It is advised to pair your lock with your security system prior to replacing the battery cover
PhysicalInstallation (912 Level Lock Model)
If drilling a new door, use the supplied template and the complete door drilling instructions available at www.kwikset.com/doorprep
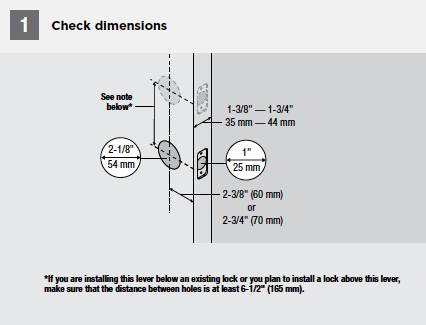
Check dimensions
- Confirm that hole is 2 1/8″ (54mm)
- If you are installing a lever lock below an existing deadbolt make sure that there is at least 6 1/2″ (165mm) of space between holes
- Confirm that backset is either 2 3/8″ (60 mm) or 2 3/4″ (70 mm)
- Confirm that the hole in the door edge is 1″ (25 mm)
- Confirm that the door is between 1 3/8″ (35 mm) and 1 3/4″ (44 mm) thick.
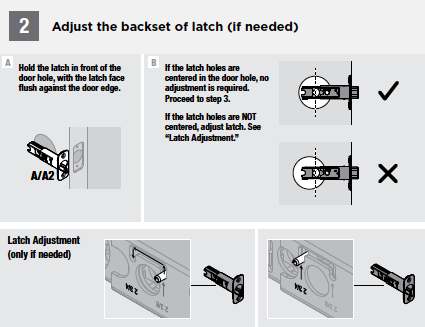
Measure the latch
- Hold the latch up to the door with the latch plate flush against the door and confirm that the holes are centered
- If holes are not centered, adjust the latch as needed
Install latch and strike
- Install the latch inside the door and secure with provided screws
Install the keypad and mounting plate
- Install the exterior keypad
- Route the cable over the latch and through the cable hole on the mounting plate
- Connect mounting plate to keypad with provided bolts
- Make sure edge of mounting plate is parallel with door edge

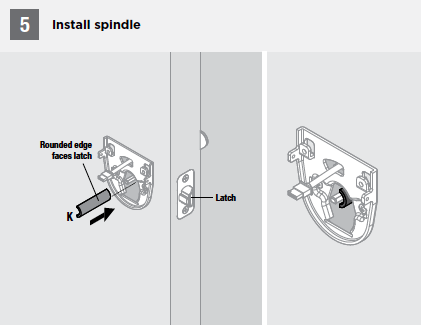
Install Spindle
- Install the spindle being sure to keep the round edge facing the door latch
Remove back cover and battery pack
- Remove the back cover and battery pack from the interior assembly
- Add batteries to the battery pack but do not reinstall the battery pack at this time
Install Interior Assembly
- Connect the cable from the keypad to the interior assembly and ensure a solid connection
- Install the battery pack
- Store excess cable in bottom of lock housing
- Push interior assembly onto mounting plate and secure with provided screws
Install levers
- Install interior lever first
- Lever handle faces away from latch
- Secure lever with provided set screw
- Install exterior lever in the same way
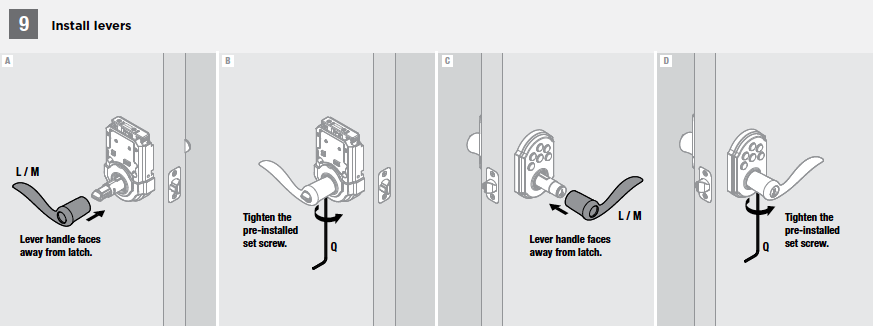
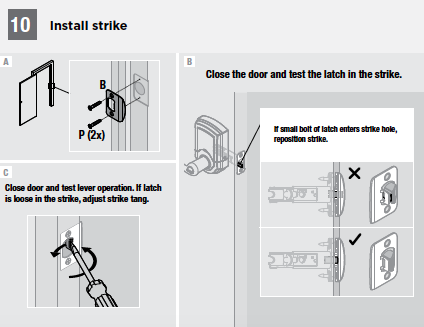
Install Strike and test
- Install the strike on the door frame and secure with provided screws
- Test operation by closing the door and making sure that the latch enters the latch hole properly
- Small bolt on latch should not enter latch hole
- Use a key to test locking and unlocking functionality
Joining the Lock to the Touchscreen
- To begin the lock pairing process, navigate to Settings > Home Devices > Door Locks on your Touchscreen
- Select “Add a Door Lock”
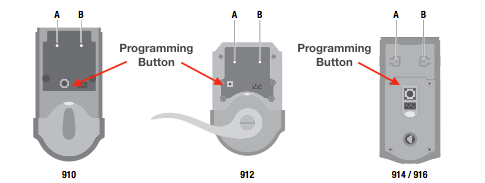
- Press the “A” button on the back of the door lock interior assembly 4 times
- Push “Next” on your Touchscreen
- As Door Locks are found they will appear on your Touchscreen
- Once the lock(s) is discovered, press next and follow the onscreen prompts
NOTE: If the pairing process fails, press the “B” button 9 times and repeat the steps above

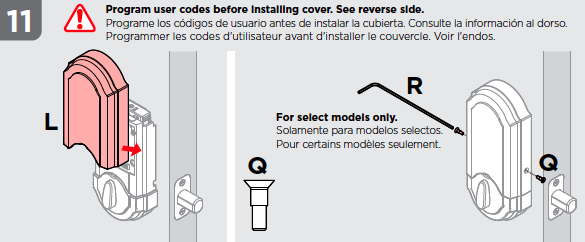
Adding User Codes
- Make sure the door is open and press the programming button once
- Use the keypad to enter user codes
- On 5 button locks, each button represents two numbers (i.e. 1 and 2 for the first button). You will only need to push the button once to get either 1 or 2.
- Example: If your code is 1-2-5-6-8, you would push the buttons depicted in the image below

- Press the “Lock” button once
- The lock will flash green once and beep once if the programming was successful
- The lock will flash red three times and beep three times if the programming was unsuccessful
Resetting to Factory Defaults
- Remove Battery Pack
- Pess and Hold the Program button while reinserting the battery pack. Keep holding the button for 30 seconds until the lock beeps and the status LED flashes red.
- Press the Program button once more. When the LED flashes green and you hear one beep, the lock has been reset
